Last Friday at 3 pm, when we had dinner plans at 6, I decided it had been too long since I’d gotten myself into a right mess of a baking project and decided to make my husband a cheesecake for his birthday — which we were already 14 hours into. I’d been dawdling because despite having 11 cheesecake recipes on this site, I find cooking things I’ve already made before boring, and was working up the courage to tackle a harebrained idea for a cheesecake that had thin stacked layers.

[I also decided to share it on Instagram Stories because your comments always crack me up when I’m elbows-deep in my latest terrible idea.]


While most cheesecakes have crumb crusts, I wanted something thinner and more sturdy for stacking purposes, so I made wafer cookies, hoping to press the dough raw into thin layers to line the pans. It didn’t work (they just couldn’t be stretched enough with fingertips) so I rolled them out between two sheets of parchment (as we do here), froze them for 5 minutes so they’d be firm, and then lined the baking pans with them. It’s definitely an annoying step but I figured I wasn’t going to write up this recipe (because it was going to flop) so I only had my own complaining (which was significant) to deal with.
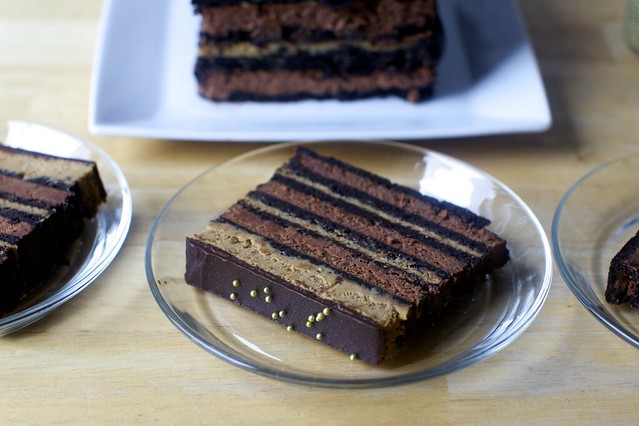
From there, however, things went surprisingly smoothly. While the wafer crusts baked, I made the cheesecake base I like so much here, divided the batter, mixed melted chocolate into one, instant espresso into the other, baked them quickly, (bakers who care about technique, cover your ears) shoved them into the freezer to cool them down really fast because it was like 5pm by now and then carved up and stacked and trimmed the layers and then whoa. I mean, I didn’t think the cake was going to taste terrible or anything (see also: cheesecake, buttery wafer cookies, chocolate, coffee) but I didn’t think it was going to be so ridiculously handsome. How fitting (aw).
As this site approaches its 14th (!) year of churning out wordy, full-color food content, I want to tell you something. Every on-a-whim kitchen experiment only goes one of two ways: it’s either heavily photographed and well-documented and ends up being a bomb, or I take no photos or photos and it turns out a freak favorite. This was the latter. So, this week, I made this entire crazy cake again and took pictures and wrote it down. For you. No seriously, come pick it up. We are way over our cheesecake quota for the month and it’s just not safe for it — or us — here.
Previously
One year ago: Fried Rice with Zucchini, Tomatoes and Parmesan
Two years ago: Chile-Lime Melon Salad and Chocolate Peanut Butter Icebox Cake
Three years ago: Frozen Hot Chocolate
Four years ago: Cold Noodles with Miso, Lime, and Ginger, Apricot Pistachio Squares and Raspberry Swirl Cheesecake
Five years ago: Strawberry Lime and Black Pepper Popsicles and Kale Salad with Pecorino and Walnuts
Six years ago: My Favorite Brownies
Seven years ago: Hazelnut Plum Crumb Tart
Eight years ago: Everyday Chocolate Cake, Zucchini and Almond Pasta Salad and Raspberry Limeade Slushies
Nine years ago: Asparagus with Chorizo and Croutons, Sour Cherry Slab Pie and Cantaloupe Salsa
Ten years ago: Blueberry Crumb Bars, Napa Cabbage Salad with Buttermilk Dressing, Key Lime Meltaways and Grilled Eggplant with Caponata Salsa
Eleven years ago: Brownie Mosaic Cheesecake
And for the other side of the world:
Six Months Ago: Korean Braised Short Ribs
1.5 Years Ago: Small Batch Tiramisu
2.5 Years Ago: Miso Black Sesame Caramel Corn and Hot and Sour Soup
3.5 Years Ago: Chocolate Oat Crumble and Oven-Braised Beef with Tomatoes and Garlic
4.5 Years Ago: Chocolate Hazelnut Linzer Hearts and Chocolate Peanut Butter Cheesecake
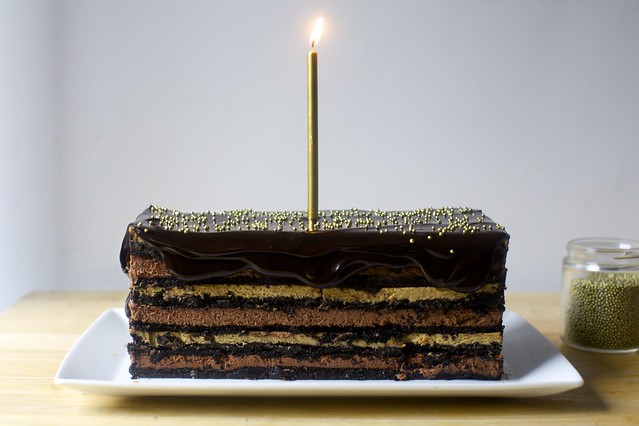
Layered Mocha Cheesecake
- 1 1/2 cups (195 grams) all-purpose flour
- 1/4 cup (20 grams) Dutch-process cocoa powder
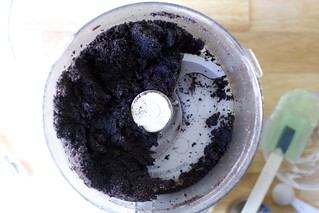
- 1/4 cup (20 grams) black cocoa powder (just use more Dutched cocoa powder if you don’t have it)
- 1 cup (200 grams) granulated sugar
- 1/2 teaspoon fine sea or table salt
- 1/2 teaspoon baking powder
- 1/2 cup (115 grams) unsalted butter, cold is fine if using a food processor
- 1 large egg
- 1 teaspoon (5 ml) vanilla extract
- 1 1/2 pounds (3 8-ounce packages) cream cheese, at room temperature
- 1 cup (200 grams) granulated sugar
- 4 large eggs
- 1/4 cup (60 grams) sour cream
- 1 teaspoon (5 ml) vanilla extract
- 4 ounces (115 grams) semi- or bittersweet chocolate, chopped, or chips (2/3 cup), (melted and cooled slightly
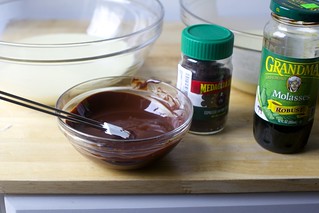
- 2 teaspoons instant espresso powder
- 1 teaspoon molasses
- 3 ounces semi- or bittersweet chocolate, chopped, or chips (1/2 cup)
- 3 to 4 tablespoons (15 to 20 ml) heavy cream
- 1 tablespoon (15 ml) corn syrup (optional, but makes it glossier)
- 1 tablespoon black cocoa powder
- Gold dragees, if you wish
Wafers
Cheesecake
To finish
Heat oven: To 350°F.
Make wafers:
…in food processor: Combine flour, cocoa powders, sugar, salt, and baking powder in the work bowl of food processor, pulsing until mixed. Cut butter into chunks and drop into work bowl; run machine until butter disappears into mixture, which will be powdery. Add egg and vanilla and run machine until the dough begins to clump/ball together.
…with an electric mixer: Beat butter and sugar together until combined. Add egg and vanilla and beat until smooth. Add baking powder, salt and cocoa and beat until combined. Add flour and mix just until it disappears.
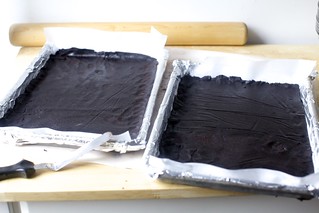
Shape wafers: Roll dough between 2 large pieces of parchment paper until very, very thin and roughly the size of a half-sheet pan (13×18 inches). Slide onto board, the back of a baking sheet, or large cutting board (parchment paper and all) and place in freezer for 5 minutes, until firm. Once firm, peel back top piece of parchment paper (it should now come off cleanly, pull it back slowly), then lay it loosely back on the sheet of dough. Flip the sheet over and do the same (gently, slowly peel back the second parchment sheet) until the dough is now loose between them.
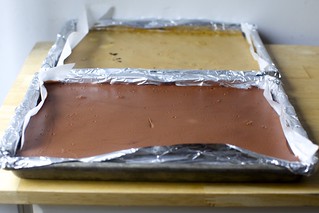
You can use the rectangles of parchment from the bottom of your baking pans to give you an idea of the sizes you’ll need for each wafer base, but you basically want to cut the sheet of dough in half. Carefully lift each dough halves into a prepared pan. Patch it where needed so that it fully covers the bottom, pressing it with your fingertips into an even layer, and out to the edges if it fell short. It’s fine if it goes up the sides a little — we’ll trim them after it bakes.
Bake wafers: For 10 minutes — they’ll be mostly, but not fully, baked. [Get started on the cheesecake batter while they bake.] Once the wafers are done, if you have any wafer edges that went up the sides of the pan, gently cut them away, which should be easy when they’re hot, but be careful not to cut through the foil. Leave oven on. Enjoy your wafer snacks.
Make cheesecake batter:
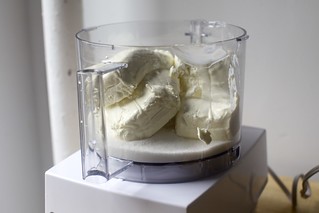
…in a food processor: (Yes, this really works.) Wipe the food processor you used for the wafer layer out so that no crumbs remain. Place sugar, then cream cheeses into the work bowl and blend until smooth. Add eggs, one at a time, blending between each, then vanilla. Scrape down bowl and blend another few seconds until smooth.
… with an electric mixer: Beat cream cheese with sugar until fluffy, then beat in eggs, one at a time, until thoroughly mixed, scraping down the sides and bottom of your bowl between each addition. Beat in vanilla.
Both methods: Divide cheesecake batter in half, into two bowls. On my scale, each half weighed 565 grams. (I’m sorry I didn’t measure it in cups. Next time!) Slowly drizzle melted chocolate into first half, whisking until fully smooth. Pour batter into first wafer pan — it’s totally fine if it’s still warm/hot from parbaking.
Add espresso powder and molasses (which makes the color magically coffee-like) to the second bowl and whisk until smooth. Pour second half of batter into second prepared pan.
Bake cheesecakes: Bake both pans at the same time, rotating them mid-way because few oven racks are perfectly level, for 15 to 18 minutes, until cheesecake is set but slightly jiggly.
Cool cheesecakes completely: I am always in a rush and let them rest at room temperature on a rack for 5 minutes and then put them in the freezer to quick cool (this takes 15 to 25 minutes, depending on the freezer). You can also cool it over a couple hours in the fridge.
Assemble your layered cheesecake: When cheesecakes are fully cool, carefully pull the foil sling lining the pan onto your counter, taking the cheesecake with it. Gently pull the foil away from the sides of the cheesecakes so that their sides are fully exposed. Next, you want to remove the parchment paper under your coffee cheesecake layer. Use a thin, long offset spatula to run it around under the wafer layer, making sure it isn’t sticking in any places. Slide the parchment paper out carefully. (Usually you would invert your cake layer onto a rack here to remove the parchment, but I don’t think this is a great idea with soft cheesecake!)
Here is the scariest part: Gently begin lifting your coffee cheesecake from the edges with your fingertips until you can slide both hands underneath it, palms up, fingers spread for maximum support. Give it a practice lift up a half-inch, then inch, before taking a deep breath and moving it quickly on top of your chocolate cheesecake layer. The first time, mine broke. I moved the pieces back into place. It was far from perfect but nobody could tell by the time it was assembled.
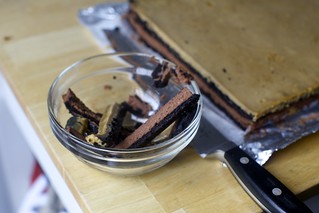
Dip a sharp serrated knife in hot water — this is the only thing that gives it a passably smooth edge, trust me — and trim the sides of the cheesecake block so that they’re even. Wipe the knife with a towel and dip it again in water between each cut — trust me. Using the same wipe-then-dip knife method every time you cut into this cheesecake, including when you serve it.
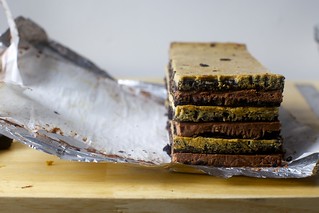
Cut your cheesecake block into 3 equal rectangles. Once you’re done trimming, your cheesecake is usually about 7×11 inches and you want to cut it along the longer side, so each third is going to be 3 2/3 inches, but I highly recommend you use a ruler and not eyeball this. Once again, use a thin spatula to carefully separate the bottom layer of the cheesecake block from its parchment paper (you haven’t done this yet for the chocolate layer) before using your hands to lift and stack thirds of the cake into a 6-layer brick-shaped cheesecake. As you’re lifting, if you notice that your cheesecake is thicker on one side than the other (this totally happens due to aforementioned uneven oven racks and is more noticeable because the cake is so thin), simply turn your layer around so that the final stack is relatively flat.
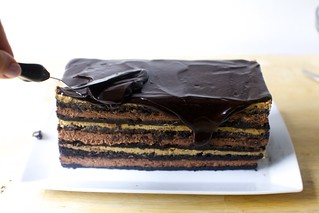
Trim the edges again if needed, so that they are smooth. To smooth them further, I found I could press a piece of parchment paper against each side and gently peel it back (see 12th photo).
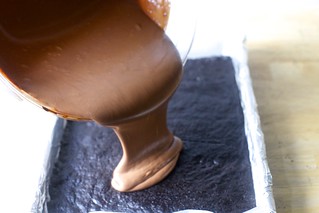
To finish: (You’re at the finish line!) Melt chocolate, 3 tablespoons of the cream, and corn syrup together and then whisk until smooth. Whisk in cocoa powder until smooth. I’m using black cocoa here to darken the color of the glaze so it looks better with the cheesecake. You want your final glaze to be thick but pourable. Add the last tablespoon of cream if needed to achieve this. Pour over top of cheesecake and use an spatula to smooth it and also push some over the edges for a drippy effect. Finish with sprinkles and refrigerate until needed.
To serve: Once again, a wet serrated knife makes the cleanest cuts. Thin slices are best because cheesecake is so rich. Leftovers keep in the fridge almost *too* well, heh.
Source: http://feedproxy.google.com/~r/smittenkitchen/~3/Q2o06EzNryo/