
Pressure Cooker Ramen Recipe
Authentic Japanese ramen noodle broths normally take hours of simmering, especially pork based (tonkotsu). We’ve simplified the recipe, without sacrificing an ounce of flavor by using an electric pressure cooker and by using easy-to-find ingredients from your regular grocery store.
Traditional tonkotsu broth is fatty, so rich, with almost an oily mouthfeel. While I love pork based ramen broth, I’m not a big fan of fatty texture. I really enjoy a smoother soup that I can enjoy from beginning to end, without feeling too-full afterwards. I’ll be showing you 2 recipes, both are a more delicate texture (less fatty) but still with full-flavor.
The two different recipes and techniques for making Japanese Ramen Noodle Soup feature: – one with the traditional pork hock, and the other with pork spareribs.
Why Spareribs?
Many recipes for tonkotsu broth feature chicken feet/wings + pork hock, or pork feet and leg, cut in several pieces, exposing as much cartilage and bone as possible. This is how tonkotsu gets is creamy, rich, thick broth. The cartilage breaks down during the long simmering and releases gelatin.
Pork hock is difficult to find, outside of Asian supermarkets. Sometimes, you can find them smoked, but that’s not what we want. Instead, my simpler version of tonkotsu ramen broth uses pork spareribs that are cut.
Why Pressure Cooker?
I love my pressure cooker! Rather than babysit a simmering pot of soup for hours on end, we like to use the power of pressure to shorten the time – from 6 hours to 90 minutes.
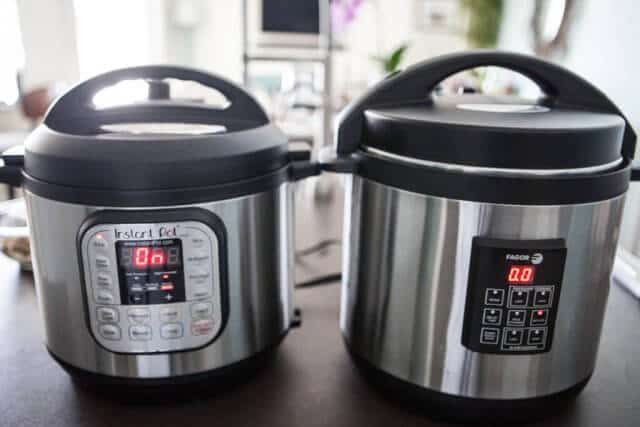
We’ve been testing out the Instant Pot electric pressure cooker, side by side with our tried and true, Fagor electric pressure cooker. I’m loving the multi-functionality of both appliances – and the size is just right for a big batch of ramen noodle soup.
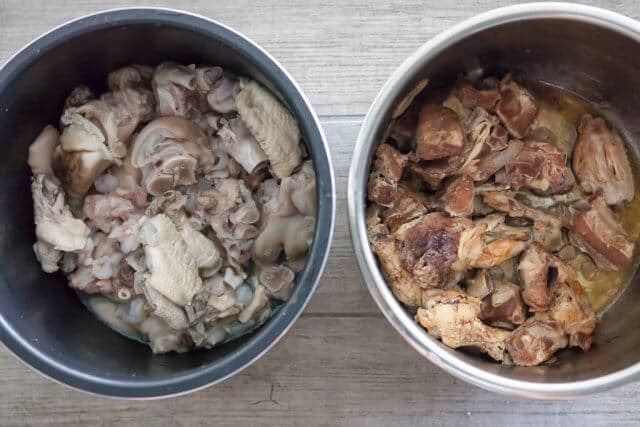
Batch 1: Pork Hock and Chicken Wings

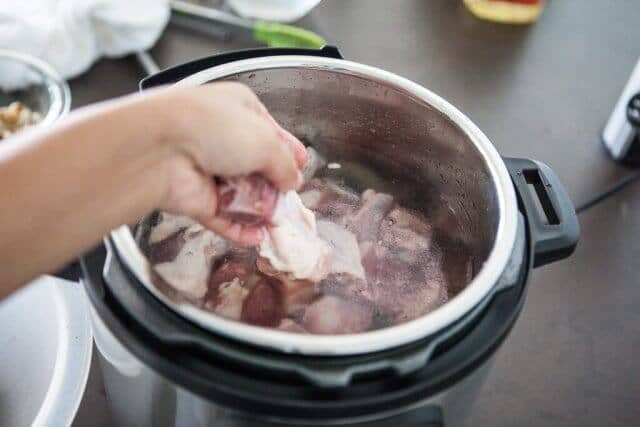
I bought this pork hock at a Chinese/Vietnamese grocery store. They came frozen and already cut into sections, exposing the bone/cartilage. All I have to do is defrost the hock. Like the first batch, I also used chicken wings as well.
When I use pork hock, I always harsh boil them off first. This cleans the hocks and the wings (I do this with chicken and beef bones, as well), scrubs off any surface scuzz, dislodges any tiny bone particles (when you cut bone with a saw, there inevitably will be powdery bone particles), removes clotting blood, dirt, surface proteins.
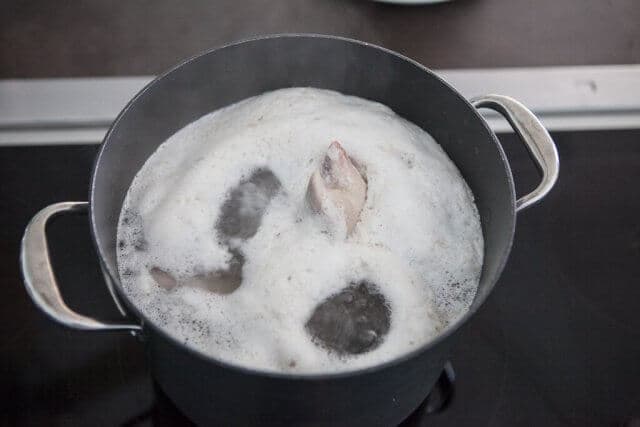
The hard, harsh boil is only for 5-8 minutes or so, then the water is discarded, the chicken bones/hock is rinsed and we start again with clean, cool water. Don’t worry about “losing any flavor” from the hard boil, who wants to eat this scum anyways?
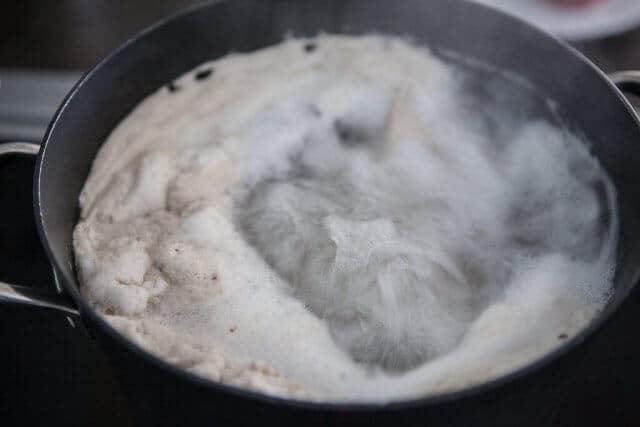
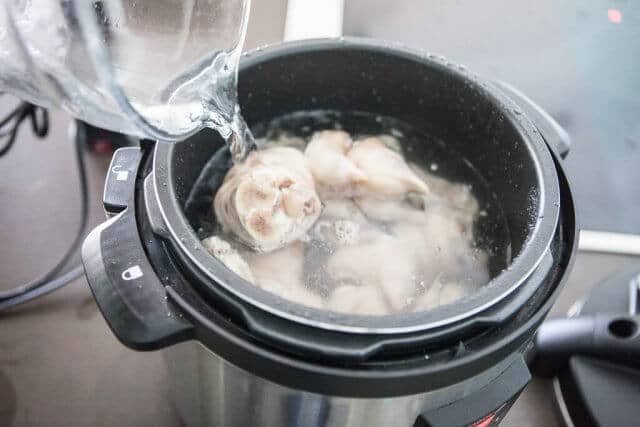
This parboiling ensures you have a clean, clear stock. Can you parboil in the pressure cooker? The electric pressure cooker does not get the water hot enough for the rolling, hard boil that is needed for this step. As you can see from the photo above, the rolling, hard boil gives the bones a good scrubbing and forces out the impurities.
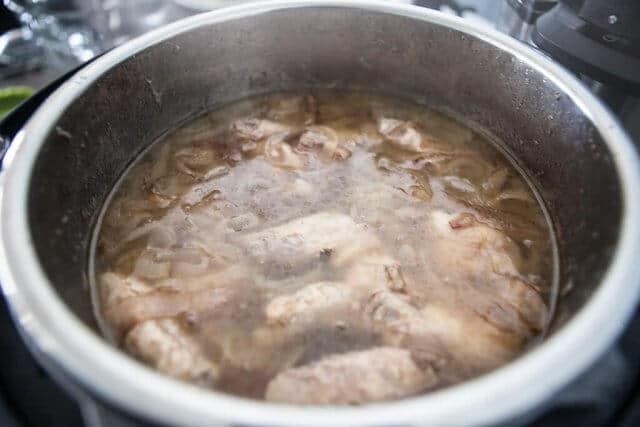
This first batch will be cooked in my Fagor Electric Pressure Cooker, with just the hock, chicken wings a little garlic and ginger. My goal is a clean ramen broth, with full meaty flavor.
Batch 2: Sparerib Bones for Ramen Soup
This batch features easy-to-find pork spareribs, which contain a lot of cartilage and bone – both of which will provide the beautiful gelatin needed for the broth.
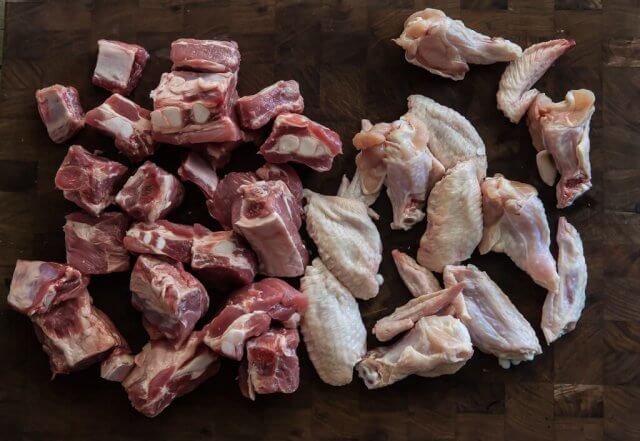
I picked up a package of spareribs, and asked the butcher to make several cross-cuts with his saw, to expose more bone and cartilage.
See the cartilage?
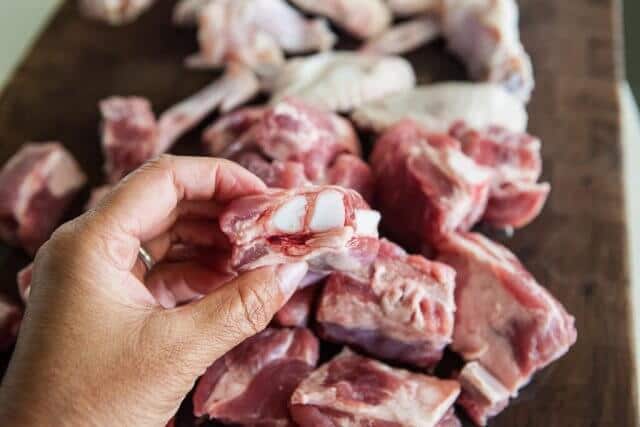
That’s what is going to make our broth just as rich and flavorful as the pork hock. We also use chicken wings as well. Chicken feet much harder to find. The wings provide a good substitute.
As with the first batch, I like to harsh-boil (or parboil) the bones – both the chicken and the spareribs – for 5 to 8 minutes – done on the stovetop. Drain to get rid of the scummy water, rinse the bones.
In this batch, we’ll also add another dimension of flavor: caramelized onions. The onions, cooked down, will provide depth of flavor, a darker and more aromatic broth.
The Instant Pot has a “sauté” setting, which is perfect for sautéing of the onions. A little cooking oil, onions and patience is what’s needed.
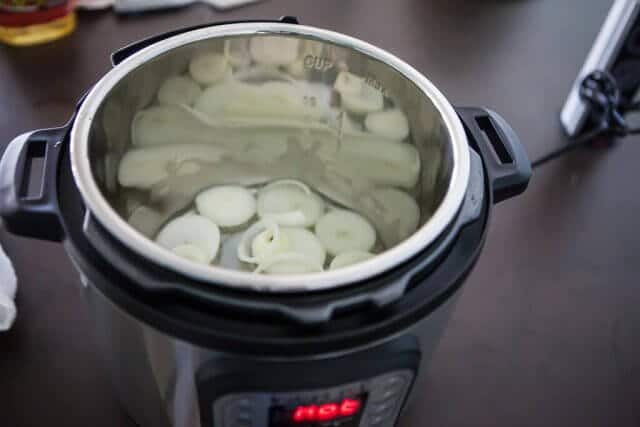
The onions should be a deep brown, but not burnt.
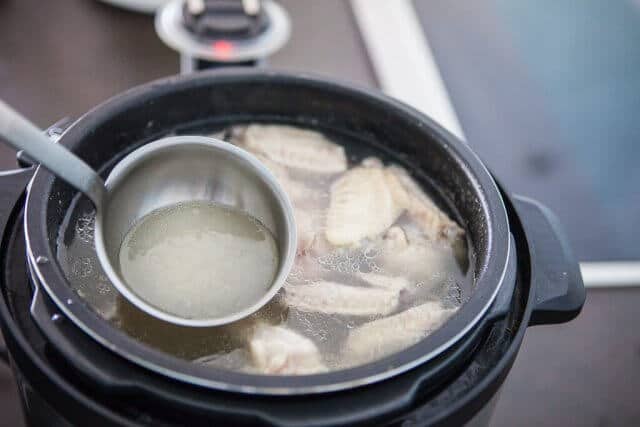
After the onions are done, pour in the water to fill to top and add in the parboiled bones.
Cooking the ramen soup
Both pressure cookers are set to go for 90 minutes.
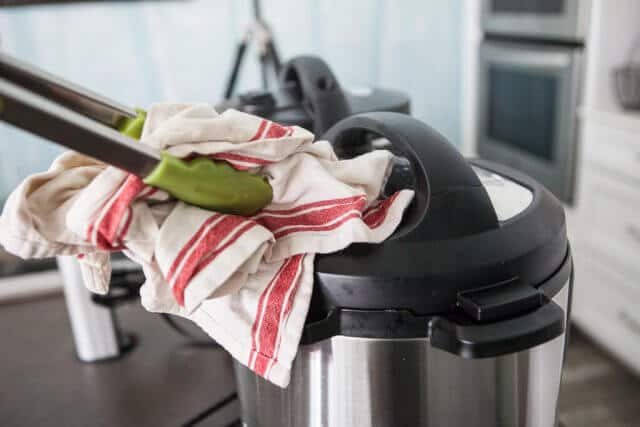
After the 90 minute pressurized cooking, you can let the steam release naturally, without any tinkering, or by releasing the valve. I like to use a pair of tongs and a kitchen towel to prevent the splatter and spitting of steam from burning me.
Batch #1 Results (Pork Hock and Chicken Wings)
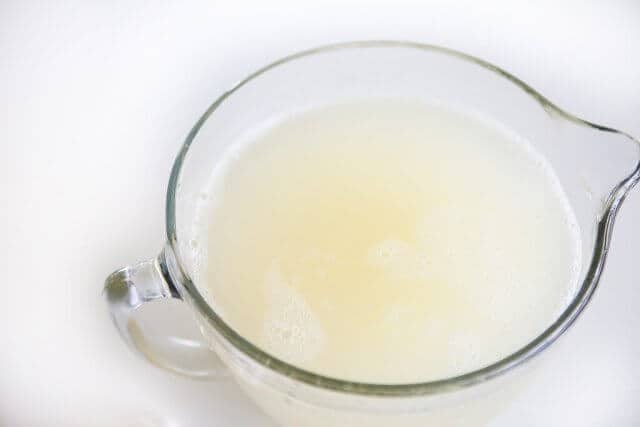
Beautiful clean, clear broth. The broth will need to be seasoned with salt. Full meaty flavor, delicate mouthfeel. It’s a thinner soup than I would have liked.
Batch #2 Results (Spareribs, Chicken Wings, Onion)
Brown, darker, richer stock. Very fragrant, better meaty flavor and thicker consistency.
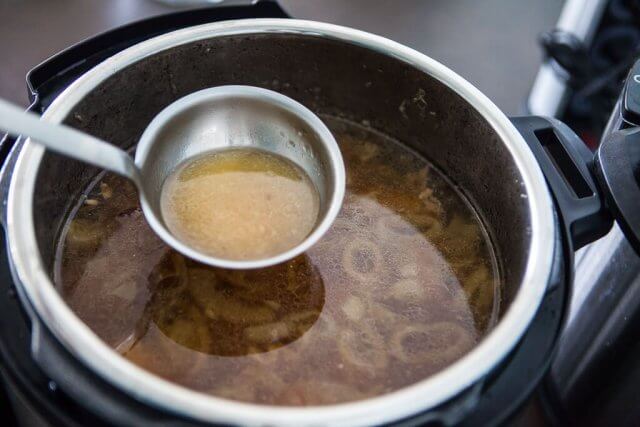
After straining, here are the two ramen broths, side by side.

How do you know if you have a good broth? If you refrigerate the broth, the result should be gelatinous. This is nearly the texture of jello and your spoon should almost be able to stand straight up! (This is broth batch #1)
There is a very thin layer of fat, which is perfect. I had skimmed a lot of the surface oils prior to refrigeration. As I mentioned earlier, I’m not a big fan of oily, fatty mouthfeel in my soups.
Conclusion
The browning of the onions makes a big difference – not just color wise, but also in flavor. The sparerib/onion batch was richer, thicker, more complete in flavor. Both batches in the pressure cooker produced broths rich in gelatin (after refrigeration, both were jello-like consistency) which gives the soup body and satisfying texture. Pork spareribs are much easier to find at grocery stores, and produce similar amount of gelatin and flavor.
I highly recommend using spareribs over pork hock. Make sure you ask your butcher to cut the ribs crosswise to expose more of the bone and collagen.
I seasoned both broths – I prefer seasoning with soy sauce, rather than just salt – but the choice is yours.
Pressure Cooker Recommendation
For the past few years, I’ve been using the Fagor Electric Pressure Cooker exclusively, and was introduced to Instant Pot by William, a Steamy Kitchen reader. He was so impressed with his Instant Pot, that he wanted to connect us with the company. Instant Pot provided us with a test unit.
Both the Fagor Pressure Cooker and the Instant Pot work similarly. While the Fagor looks bigger in size, they both hold 6 quarts. The Fagor includes a thinner, non-stick pot, and the Instant Pot has a 3-ply bottom stainless steel heavy duty cooking pot, which I prefer. You can purchase a stainless steel pot separately, for the Fagor. Both units slow cook, pressure cook and sauté.
Instant Pot IP Duo-60: $ 132.45
- 7-in-1 Multi-Functional Cooker–Pressure Cooker, Slow Cooker, Rice Cooker, Sauté/Browning, Yogurt Maker, Steamer & Warmer
- Large, easy to use control panel with 14 built-in Smart Programs, Dual pressure, Automatic keep-warm and 3 temperatures forsauté and slow cook
- UL and ULC certified with 10 proven safety mechanisms; Highly energy efficient and kitchen friendly
- Include 3-ply bottom stainless steel cooking pot, stainless steel steam rack with handle & manual and recipes in English, Spanish, Chinese and French
Fagor: $ 81.99
- 6-quart multi-cooker functions as rice cooker, pressure cooker, and slow cooker
- Low/high pressure; self-locking lid; auto pressure release; 2 pressure-control valves
- Overheat protection; “brown” and “keep warm” settings; LED screen; 8-hour delay timer
- Stay-cool handles; recipes included; dishwasher-safe nonstick cooking pot
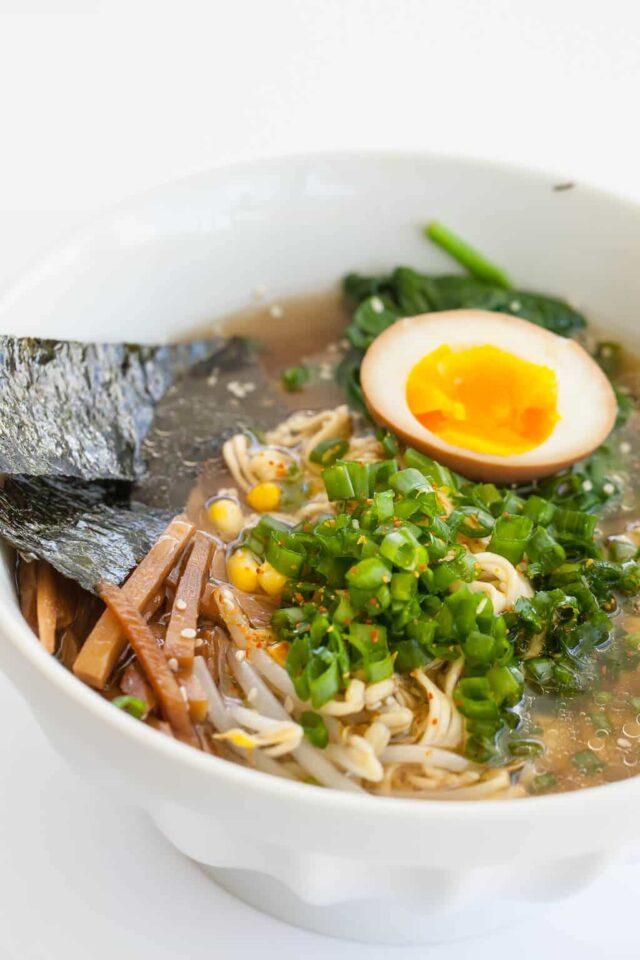
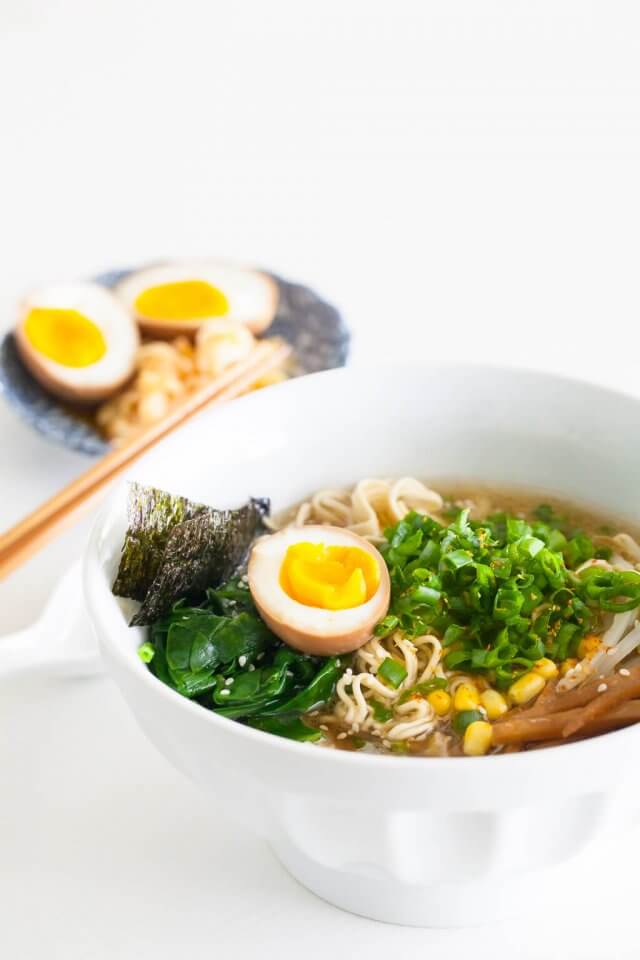
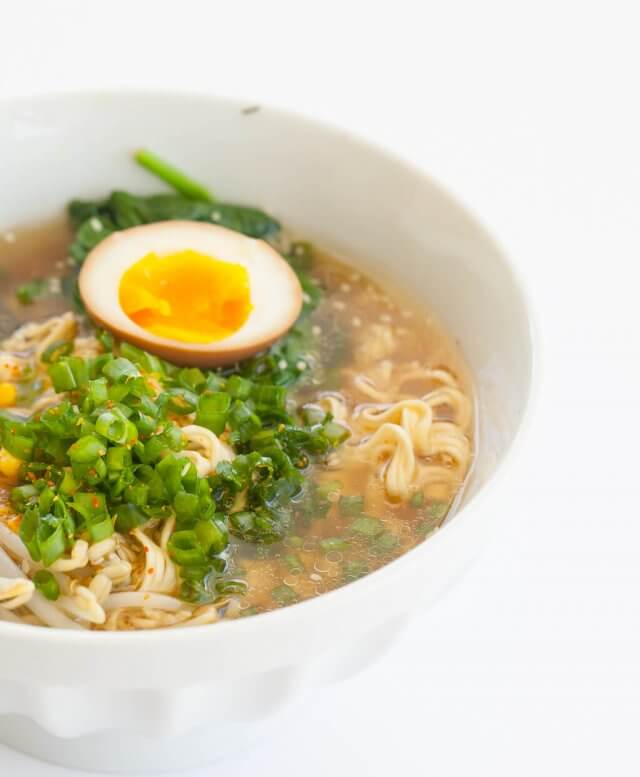
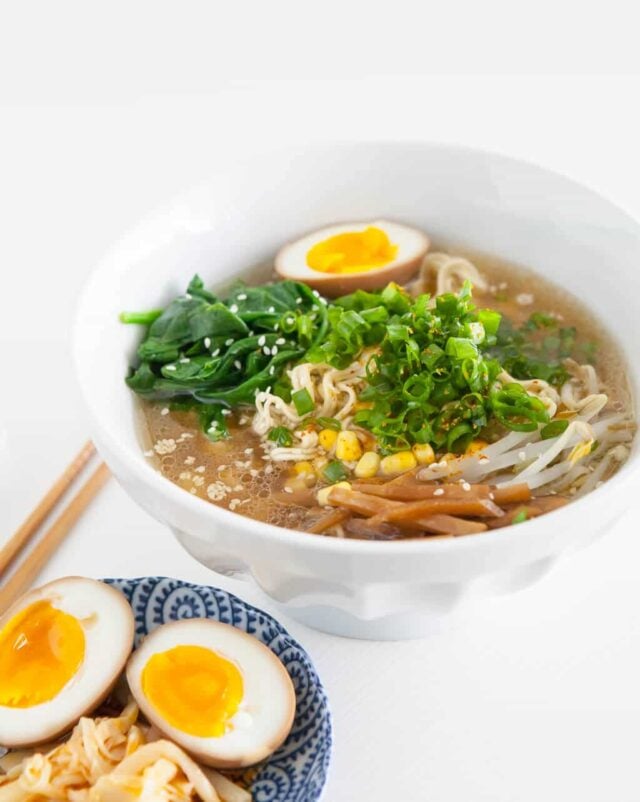
Soy Sauce Eggs
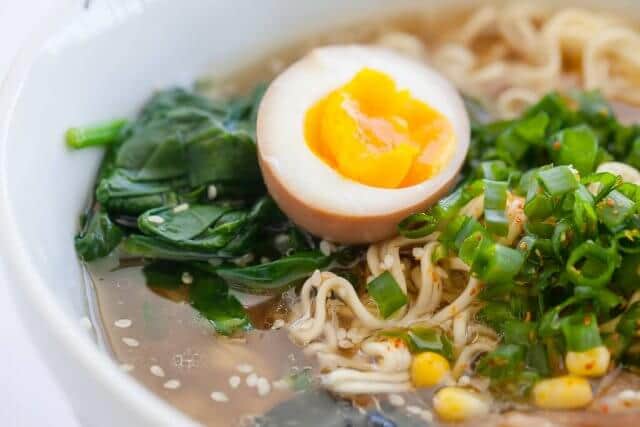
I served the ramen with easy to make soy sauce eggs. Don’t just limit these eggs to a bowl of ramen, though. We love them as a snack, or as a side dish along with Japanese pickles. The eggs are soft+ boiled, meaning the yolk is not just firm, not runny, but not powdery like a hard boiled egg.
Add 3-6 eggs to a pot, cover with water by 1-inch. Bring water to a rolling boil, remove from heat and cover. Let sit for 6 1/2 minutes. The eggs should be a perfect soft+boiled egg with a custardy yolk that’s still creamy and firm whites.
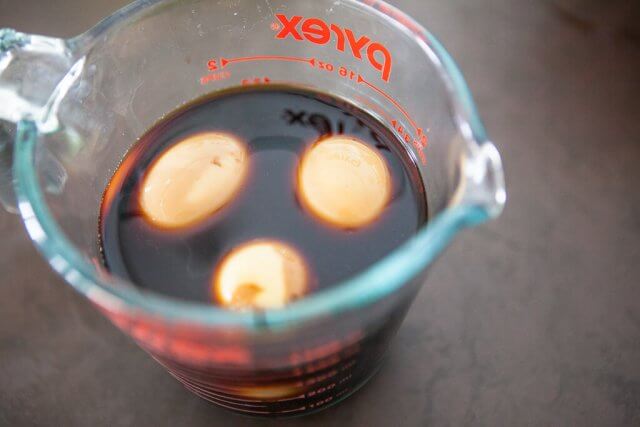
While the eggs are cooking, you can prepare the sweet soy sauce. Whisk together: 1/2 cup of low-sodium soy sauce + 1/4 cup water + 1 1/2 tablespoons sugar. It’s best to have a skinny, tall container (like my Pyrex measuring cup) or you can use a quart-sized sealable bag.
After the eggs are cooked, immediately rinse in cool water. Peel the eggs, and add the eggs whole into the sweet soy sauce to marinate for 2 hours or overnight in the refrigerator. When ready to eat, remove eggs (reserve sweet soy sauce for another use) and cut each egg in half.
Or – you can soft boil/hard boil eggs with a microwave egg cooker – we’ve been using this one for the past 4 years. Since our hens produce so many eggs are soft or hard boiled by STEAM instead of being submerged in water. The steaming action actually makes the eggs so much easier to peel! This is important for us, since our eggs are same day fresh and are difficult to peel, cooked traditionally on the stovetop. (Older eggs are easier to peel than fresh laid eggs — the moisture evaporates as the eggs get older, leaving more space between the shell and the egg whites as it cooks.
You can reuse the sweet soy sauce again:
- for another batch of eggs
- as a dipping sauce for dumplings (I like to also add a spoonful of chile garlic sauce)
- a couple spoonfuls in a stir fry
- toss with cooked noodles + scallions for a quick side dish
- drizzle over steamed vegetables
- use to season the ramen broth (if you like a slightly sweeter tasting broth)
Other Toppings

- Finely minced green onions (scallions)
- Fresh bean sprouts
- Cooked bamboo shoots – from a can is fine. Canned bamboo shoots are pretty bland tasting, so I also marinate them in the sweet soy sauce from the eggs (see above recipe). Actually, I just throw the bamboo shoots in with the eggs and they’ll marinate together.
- Blanched spinach – Fresh spinach: just a few of seconds in boiling water, or defrost frozen spinach. Make sure you squeeze out as much water from the spinach as possible.
- Sesame seeds
- Pieces of nori (seaweed)
- Shichimi Togaroshi – Japanese 7-pepper blend made of red chili pepper, orange peel, sesame seeds, Japanese pepper, ginger and seaweed. This is also my secret ingredient to the best scrambled eggs

- Tiny drizzle of Asian sesame oil (don’t use too much or the sesame oil will overpower the soup)
- shhh…don’t tell anyone, but I also love Chinese preserved bamboo shoots in chile oil in my ramen, too.
Ramen Noodles
 For these photos in this recipe, I used dried Japanese ramen noodles. Make sure you use noodles that are dried, not fried (like cheap instant ramen).
We’ve been testing out recipes to make ramen noodles all month long, just a few more batches of testing and we’ll be sharing our ramen recipe. I bought my mom a Philips Noodle Maker.
She raved about it so much that I bought myself one, too. WE LOVE IT! It’s fun making fresh pastas in different shapes. Our ramen recipe still needs a little tweaking and testing, but we’ll publish soon.
If you’re up to making ramen noodles from scratch, Not So Ancient Chinese Secrets can show you how! They also like using the Philips Noodle Maker.
Thank you for supporting Steamy Kitchen!

Pressure Cooker Ramen Recipe
We recommend the Instant Pot 6-Quart electric pressure cooker. Always follow the manufacturer’s instruction for use. To serve, see list above for topping ideas. Try the soy sauce eggs!
Ingredients:
2 1/2 pounds pork spareribs, cut into 2″ pieces
1 1/2 pounds chicken wings
2 tablespoons cooking oil
2 large onions, peeled, thick sliced
3 cloves garlic, smashed
thumb-sized nub of ginger
soy sauce or salt, to tasteDirections:
1. Bring a big stockpot filled with water to a boil (If your electric pressure cooker pot is stovetop-safe, feel free to use that instead of dirtying another pot.) Add in the ribs and the wings. Return to boil, let cook for 5-8 minutes at a hard boil on high heat. Drain and discard the water. Rinse the ribs and wings with clean water, getting rid of any scum clinging to meat.
2. Following the manufacturer’s directions, turn the electric pressure cooker to saute or brown, on high heat. Swirl in the cooking oil and add in the onions. Brown the onions, about 8 minutes. Take your time!
3. Add in the garlic and the ginger into the pot, then add ribs and wings. Fill pot with water up to the “MAX” line. Close lid of pressure cooker, set to cook on high pressure for 90 minutes.
4. After cooking, let pressure release naturally, or use a kitchen towel and tongs to manually release pressure, being very careful of splatters.
5. Strain broth with fine mesh strainer, discarding the solids. Skim any surface oils on the broth, if desired. Season broth with soy sauce or salt, to taste.

More Ramen!

Steamy Kitchen Miso Ramen
Serious Eats Ramen Recipe
Lucky Peach Tonkotsu Ramen Recipe
No Recipes Chicken Ramen
Chow Slow Cooker Ramen
Source: http://steamykitchen.com/40348-pressure-cooker-ramen-recipe.html