Many years ago, with absolutely no experience or clue, I made a wedding cake for friends. It was fun and I learned a lot, but in the end declared it “fully out of my system.” Apparently, 9 years is the statute of limitations on such claims, which is how it came to pass that when one of my oldest friends asked me to make his wedding cake, the words “that would be so much fun!” flew out of my mouth before anyone could talk me out of it. Would you like to come along for the ride?
Let’s talk about GCC.
The last time I made a wedding cake, the bride loved vanilla and coconut and lime and mango and the groom loved chocolate above all else. Because the wedding was relatively small (under 100), I decided to make both (the largest tier in chocolate and the smaller two in vanilla) everyone had a taste of each. This time, one groom loves peach and blueberry pie, and the other has a thing for things like chocolate and salted caramel; I could never choose between the two either but with a much larger headcount (180 invited), it had to be done. It was made easier when we were brainstorming one night and they announced they both loved German Chocolate Cake. Crisis, averted. Or, at least this one.
Not that I’ve ever made or tasted a German Chocolate Cake before, and so I began with some research. Did you know that German chocolate cake isn’t German? If written correctly, it’s actually “German’s” chocolate cake, as in, named after a guy (Samuel) with the last name German. He developed the baking chocolate in 1852 that now goes by Baker’s German’s Sweet Chocolate. In 1957, 105 years later, Wikipedia tells us that The Dallas Morning News printed a recipe for German’s Chocolate Cake that was created by Mrs. George Clay, a homemaker, which became wildly popular. General Foods, which owned the Baker’s brand at the time, took notice and distributed the cake recipe to other newspapers in the country. At some point, the possessive (German’s) was dropped, leading to all sorts of confusion.
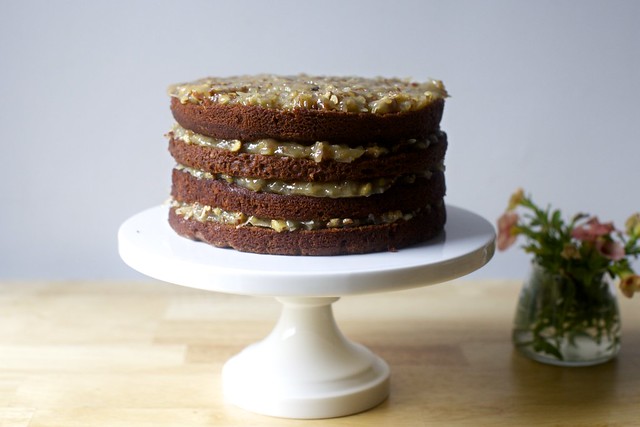
Traditionally, it’s a fairly fluffy mildly chocolate layer cake with a caramel-y custard filling with pecans and coconut. While in many cases, the “back of the box” recipes aren’t exactly considered the best in category, in this cake, the on the Baker’s German Chocolate box in fact the original, and the gold standard. So, my research began there, and also by picking up slices from a couple bakeries in the city…
You guys, I hated them all. True, it’s just not my favorite (or ever 10th favorite) cake. True, it’s not my wedding, it needn’t be my favorite cake. But even though I knew a coconut pecan custard filling and a pale-ish chocolate cake was never going to make me swoon, I still knew that there had to be ways to get more flavor from them and the grooms were all for it. (I also called in my friend Molly for tastings, as this is her favorite cake and I knew she wouldn’t mince words if my version veered from the platonic ideal of what the cake could be.)
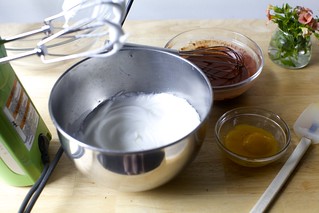
The test version we liked the most, not fully shown here, ended up with bittersweet chocolate instead of “German’s,” some hot coffee to (instead of hot water) give it oomph and some cocoa powder replacing some of the flour to give it a little more chocolate gravitas. To maximize the flavor impact of every part of the filling, I reduced the sugar, swapped in some brown sugar for white, deeply toasted the pecans, lightly toasted the coconut, increased the salt and then, I mean, of course I did, I browned the butter. Here, it makes everything better.

Wedding cake-ing it
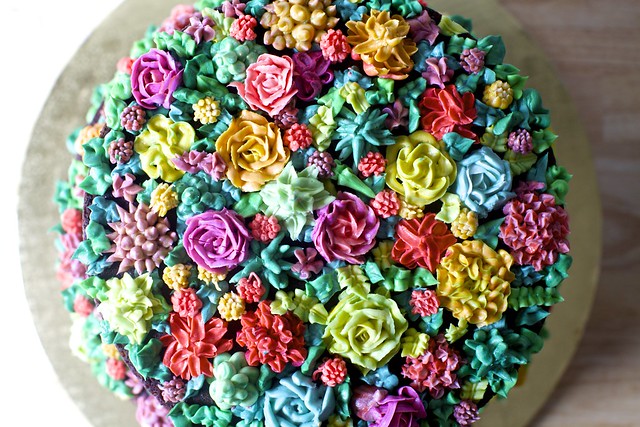
I won’t lie, as a wedding cake, it’s not the easiest choice namely because there are so many processes, from melting chocolate, separating eggs, whipping the whites separately, sifting cocoa (mine is always lumpy), and that’s just the cake. The filling, especially the way we preferred it, is full of extra steps (toasting the butter, pecans, and coconut, and more separated eggs), plus it needs to be cooked and cooled. Fortunately, decor-wise, nobody was looking for anything too floofy or traditional, they had no wedding “colors” and we all liked the rustic look of a “naked” (no frosting on the sides) cake. Inspired by Molly Yeh’s stunning forays in to buttercream flower gardens, I figured the relatively absence of other decor would leave me lots of time to try my (way less practiced) hand at something like that for the top. (Stop laughing, quit it, I can hear you.)
After endless staring at wedding cake guides, measuring my oven and weeks of boring hemming and hawing, I concluded that the best way to serve the 140 guests (although this technically could serve 170, I wanted to play it safe because this is not a cake that would cut cleanly plus you lose slices to dowels and more) was with a 14, 12, and 10-inch tier. This was exactly 48 hours before I began baking the cake. Are you getting stressed out reading this yet?
The schedule
Herein lies my best-laid plan:
• Saturday: Hit up the baking supply store for cake pans, boards, a cake box, dowels, extra piping bags, a few extra piping tips and a bunch of floral-ish food colors.
• Sunday: Lay out the recipe in a spreadsheet to scale it up and finish buying groceries.
• Monday and Tuesday: Bake cake layers, freeze them off, wrap them in plastic.
• Wednesday: Make filling
• Thursday: Fill layers and dowel cake, begin decorations.
• Friday: Stack cake, finish decorating and go go go.
It sounds so organized, right?
Here’s what actually went down:
Saturday: Nailed it. See? We’ve got this.
Sunday: My oven, which hasn’t been great at holding temperatures consistently over the last six months (basically an oven’s job, you could say) seemed to be on the verge of a full meltdown, and thus, so was I. I might have thrown a hissy. Plus: Groceries or as much as we could schlep and stuff under the stroller, which is to say, not all of them.
Monday morning: Back to the grocery store with a rather cranky toddler on a hot rainy day. When we returned, wet, sweaty and already exhausted, a guy was waiting outside my apartment to wheel an old (well, 2 months but it was ugly, dirty and smelled like onions and basically made me want to cry) oven from another apartment that was empty into mine. I glared at it. I resented it. I was so scared I’d be in for another dud but it turns out to work great and I kind of want to give it a biscuit for being such a good boy last week.
Monday afternoon: Baking actually begins. I get the 10-inch tier baked, frozen, then wrapped in a couple layers of plastic. Now that I’m in the swing of things, I’ll be faster tomorrow I told myself.
Tuesday morning: I decide I have time to go to the gym. I do not have time to go to the gym.
Tuesday afternoon: I only have time to bake the 14-inch tier. Each layer’s batter fills a full Kitchen Aid bowl, so I basically have to make the cake twice for each tier. I tried to combine what processes I could but it more often than not led to extra, not less, work such as when I had to then re-divide the buttermilk-chocolate-coffee mixture or rewhip whites because of course they half deflate in the time one layer bakes.
Wednesday morning and afternoon: I bake the 12-inch tier. Very behind schedule, I decide that if the filling for all three tiers will fit in one pot, I’ll make it all at once. 26 egg yolks, 1.5 pounds of brown butter, 2 quarts of half-and-half and 2 children hungry for dinner later, I got impatient for this 6-quart pot to cook and cranked it up. I scrambled the whole thing. It went in the garbage. I went back to the store.
Wednesday night: I made the filling in three batches, one for each tier, as slowly and carefully as a human has ever made anything. I finished up before midnight.
Thursday morning: Baby wakes up at 5 because of course she does. I get a late, sluggish start — but hey, filling cakes doesn’t take long, right? I take the cakes out of the freezer, hoping to work with them semi-defrosted (i.e. sturdier than room temperature but not too icy to cut).
Thursday late morning and afternoon: While trying to divide each of the cake layers into two thinner layers, I remembered why I absolutely hate splitting cake layers and almost always prefer to just bake them up thinner. This tender, soft, fluffy cake was a nightmare; it broke and broke. The filling for the bottom tier kept running out because I hadn’t dam-ed my layers. Jeez, it’s almost like this is why people leave wedding cakes to the professionals.
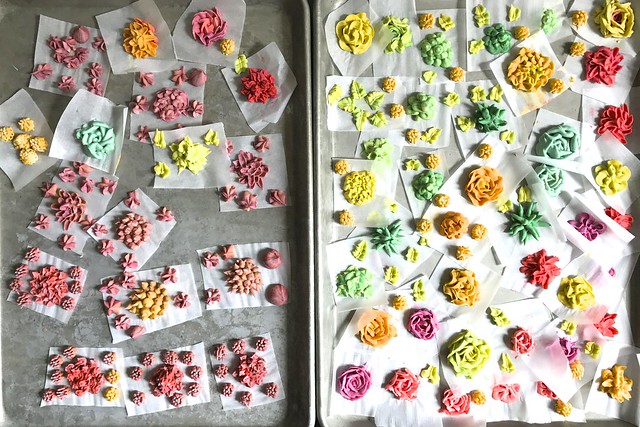
Thursday, 40 minutes before the kids get home: I decide it’s time to see if I still know how to make buttercream roses, my single piping skill. I watch a bunch of videos, realize there’s no way I’m going to learn anything new at this point and decide to pipe a collection of Florals Not Found In Nature, i.e. various piles of bloops and dollops and spirals in random colors. Possibly for the first time all week, it goes better than I expect. I freeze them on a tray overnight.
Thursday, 11p.m.: We’re about to go to bed and we realize that I might have some trouble doweling and stacking the cake — which has got to be 50 pounds — by myself the next day and do it right then. Remember when Thursday night was date night? Me neither.
Friday morning, somehow it’s 11am and I’m just getting started and we want to leave at 1 and also of course my weekend bag isn’t packed yet either: I arrange the pre-piped flowers all over and basically came up with a frosting hack I’ll now want to do forever involving one frosting bag and multiple tips to make pretty much every color and shape you see on the cake. Should I write it up sometime? I’m thinking about it, but this is already running very long.
Friday, 1pm: I totally botched this quote on Instagram Stories but I’ve always loved this line from Tina Fey about lessons she’d learned from Lorne Michaels in her SNL years:
The show doesn’t go on because it’s ready; it goes on because it’s eleven-thirty.
Which is just to say that while I wondered if I should trim or frost the sides where the filling was leaky or add some chocolate frosting, as it’s traditional too, the cake was declared done because it was time to go. I think it was the right choice.
What I’d do differently next time (just kidding, honey):
• Um, start a little earlier
• Um, probably not curdle the filling
• I’d pipe a ring around the filling in buttercream or more likely use this fudge buttercream and put the cake’s soft filling inside. It prevents leakage. I knew this technique 9 years ago but somehow forgot it until it was a bit too late.
• I don’t want to bore you with even more details, but when you’re baking a cake that’s 12″ or larger or deeper than 3″, it’s usually recommended that you do something to help distribute the heat. There are many techniques and tools (here’s a rough list); I picked a cake heating core. It was all wrong for this cake, I felt like the core never fit properly back in the cake or looked even. I would absolutely skip it next time, trying something else.
• Not cut the cakes into two thinner layers: While totally doable for this cake in a 6- or 9-inch size, it was bonkers to take on in 12″ and 14″ sizes. I would simply bake them up in thinner layers — it always looks nicer, anyway.
What I wouldn’t change at all: You you you you
Last week, I shared my process as “live” as possible on Instagram, something that isn’t my usual thing but I needed some other people to talk to about the mess I’d gotten myself into and you came through by the truckload. I loved all the messages I received and your cheering and excitement for the project, just like last time, plus sharing all of your own wedding cake stories made this 500 times more fun. Seriously. You are, as always, the very best part of this gig.
German Chocolate (Baby) Cake
Why 6-inch pans? They’re my favorite to test cakes in because they hold exactly half of a more standard 9-inch cake layer. They’re also delightful for tiny party cakes like this — they serve 6 to 8 in adorable slices. To make this into a more classically sized 9-inch round birthday cake, double everything.
Many German Chocolate Cakes have a ganache or dark chocolate frosting element. My favorite go-to chocolate buttercream is this; this volume could be used to thinly coat the sizes of the cake. Or, you could fully chill the cake and pour a drippy ganache over the top made from 1/4 cup heavy cream (I like to put 1/2 teaspoon of instant coffee or espresso granules in it) brought to a boil and poured over 4 ounces of dark chocolate chips. Let sit for a minute then stir until smooth before pouring.
-
Cake
- 2 ounces (55 grams) bittersweet chocolate, chopped
- 1/4 cup (60 ml) hot coffee
- 1/2 cup (120 ml) buttermilk
- 2 large eggs, separated
- 1/2 cup (113 grams) unsalted butter, softened
- 1/2 cup (100 grams) granulated sugar
- 6 tablespoons (70 grams) light or dark brown sugar
- 1/4 teaspoon fine sea or table salt
- 1/2 teaspoon vanilla extract
- 1/4 + 1/8 teaspoon baking soda
- Just barely heaped 1/4 cup (22 grams) cocoa powder (any variety)
- 3/4 cup (100 grams) all-purpose flour
-
Filling
- 1 1/3 cups (3 1/2 ounces, or half of a 7-ounce bag) sweetened flaked coconut
- 3/4 cups (80 grams) chopped pecans
- 4 tablespoons (60 grams or 2 ounces) unsalted butter
- 2 large egg yolks
- 3/4 cup (175 ml) half-and-half (or a mixture of 1/2 cup milk and 1/4 cup heavy cream)
- 1/2 cup (100 grams) granulated sugar
- 2 tablespoons (25 grams) light or dark brown sugar
- 1/4 teaspoon fine sea or table salt
- 1 teaspoon (5 ml) vanilla extract or 1/2 teaspoon vanilla and 1/2 teaspoon dark rum
Place chopped chocolate in a medium bowl. Pour hot coffee over, give it one minute, then whisk until smooth and chocolate is melted. Whisk in buttermilk; it might look gross, ignore it, it’s fine. Set aside.
Beat egg whites in a clean medium bowl with clean beaters until stiff. Set aside.
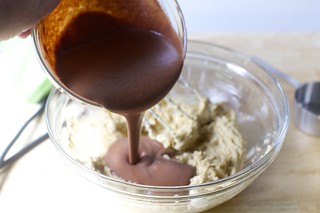
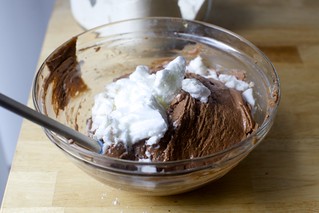
In a large bowl, use same beaters — no need to clean them, even — to beat butter, sugars and salt together until fluffy. Beat in yolks and vanilla until smooth. Sprinkle baking soda over and beat in well to combine. Scrape down sides. Add cocoa powder and flour and beat until just combined. Fold/stir in 1/4-1/3 of egg whites to loosen batter. Fold in rest gently, just until no white spots remain.
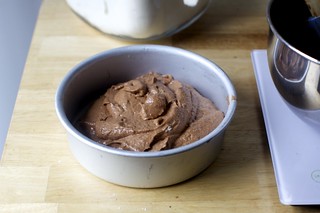
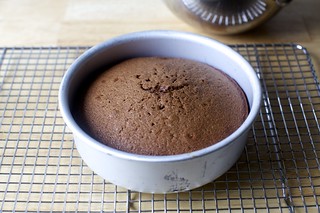
Divide between baking pans. Bake for 24 to 26 minutes, until a toothpick inserted into the center comes out batter-free. Immediately run a knife around the cake but cool in pan on rack for 10 minutes before inverting onto a wire rack to cool completely.
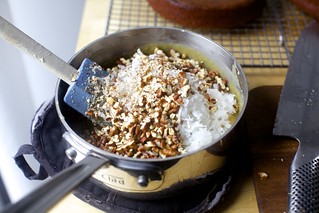
Make the filling: Spread pecans out on one small tray and coconut on another. Bake in 350 degree oven until pecans are deeply toasted (10 to 15 minutes, but check at the early end) and coconut is lightly toasted on top (15 to 20 minutes, but check early as well), tossing them once or twice for even coloring. Let cool. I prefer the coconut less “stringy” and pulse it, once cool, a few times in a food processor to chop it further. Place pecans and coconut in a large bowl and set aside.
In a large saucepan, melt butter and keep cooking after it has melted, stirring often, until it becomes toasty brown near the bottom of the pan and smells heavenly. Remove from heat, pour into a small dish to cool slightly and let saucepan cool before cooking filling.
Whisk egg yolks, half-and-half, sugars and salt together in empty saucepan until blended. Very slowly drizzle in semi-cooled browned butter, whisking the whole time. If your yolks and half-and-half were cold (which is fine), the butter might take on a clumpy appearance as it solidifies in the mixture; this is not a problem. Return saucepan to the stove and heat over medium-low, stirring the whole time so that it doesn’t scorch at the bottom, until the mixture is hot, steamy, and thick enough to coat a spoon. Learn from my lesson: Do not let it boil.
Remove from heat and stir in vanilla (or vanilla and rum), then pour over bowl with pecans and coconut, stirring once to combine, and let filling cool before using. It will thicken up once cold.
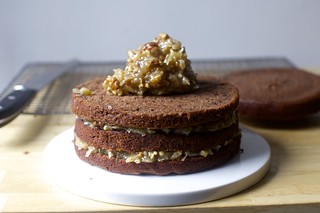
Assemble cake: Using a sharp serrated knife, cut cooled cake layers into two thinner layers. Place the bottom of the first one on a cake plate or stand. Scoop 1/4 of the cooled filling (my quarters weights 112 grams each) into the center and use a knife or offset spatula to push it just to the edge. Repeat three times (I like to end with the bottom of the second cake as the “top” for a flat finish), placing the last layer of filling on the top.
To serve: Cut into wedges.
Do ahead: Keep cake in fridge until needed. I tested — because I wanted to make sure the cake would not dry out over the days I needed to make it for the wedding — and found that even a 5-day old version of this cake wasn’t bad at all. I.e. It keeps well.
How To Scale Up Cake Sizes, For Weddings and Beyond:
When I want to scale a cake from, say, a 6-inch round to a 9-inch round or a 6-inch round to 10-, 12- and 14-inch rounds, I do it by the bottom area of the cake pan, not the volume of the batter, because my goal is to keep the cake thicknesses the same.
For example, a 6-inch cake has a bottom area of 28.3 square inches, a 9-inch (63.5), 10-inch (78.5), 12-inch (113), 14-inch (153.9). Want to turn a 6-inch cake into a 14-inch cake? You’re going to want to multiply every ingredient by 5.4. [Except the baking time. It’s often closer to the original than you’d expect, and rarely more than double.]
I then use those numbers to figure out how many full and partial batches of my recipe I’ll need. If you’re good with spreadsheets or married to someone who is, this can make it easy.
I know what you’re going to ask next: Deb, what do I do with 2.86 egg yolks? And the answer is, you go with your gut. I actually leave my recipes in weird fractions so I don’t overthink it before I start. For 2.86, I’m going to round up. But if I need .55 cups of flour, I’ll probably just heap the 1/2-cup slightly. (Or use weights, of course. With weights, this stuff is 10 times easier and there’s no such thing as a weird number.)
But to make things even more complicated, the cake as written is a 3-inch tall cake, a perfect size for a rich layer cake. But wedding cake tiers should generally be at least 4 inches tall. To get this to 4-inches tall, before I did any other math, I increased the cake recipe by 1/3. But not the filling. Because the filling already covered 4 cake tops, and I only needed it to cover 3 for the final cake, as I planned to use buttercream for the decorations, I didn’t increase the filling by 1/3 before scaling up the recipe to the other cake sizes. I just redistributed the 4 layers of filling over 3.
If you’ve got any questions, bring them on!
Source: http://feedproxy.google.com/~r/smittenkitchen/~3/BqBpuNwvOHY/